本文是『 深入浅出 Flutter Framework 』系列文章的第八篇,也是收官之作。通过自定义渲染型 Widget,我们一步步地实现了一个评分组件。
©原创文章,转载请注明出处!
本系列文章将深入 Flutter Framework 内部逐步去分析其核心概念和流程,主要包括:
『 深入浅出 Flutter Framework 之 Widget 』
『 深入浅出 Flutter Framework 之 BuildOwner 』
『 深入浅出 Flutter Framework 之 Element 』
『 深入浅出 Flutter Framework 之 PaintingContext 』
『 深入浅出 Flutter Framework 之 Layer 』
『 深入浅出 Flutter Framework 之 PipelineOwner 』
『 深入浅出 Flutter Framework 之 RenderObejct 』
『 深入浅出 Flutter Framework 之自定义渲染型 Widget 』
Overview
本文作为『 深入浅出 Flutter Framework 』系列文章的收官之作,为了对本系列文章所涉重点内容的回顾和总结,动手实现一个渲染型 Widget (Render-Widget)。
如下图,最终成品是一个评分组件 (源码已上传 Github: Score):
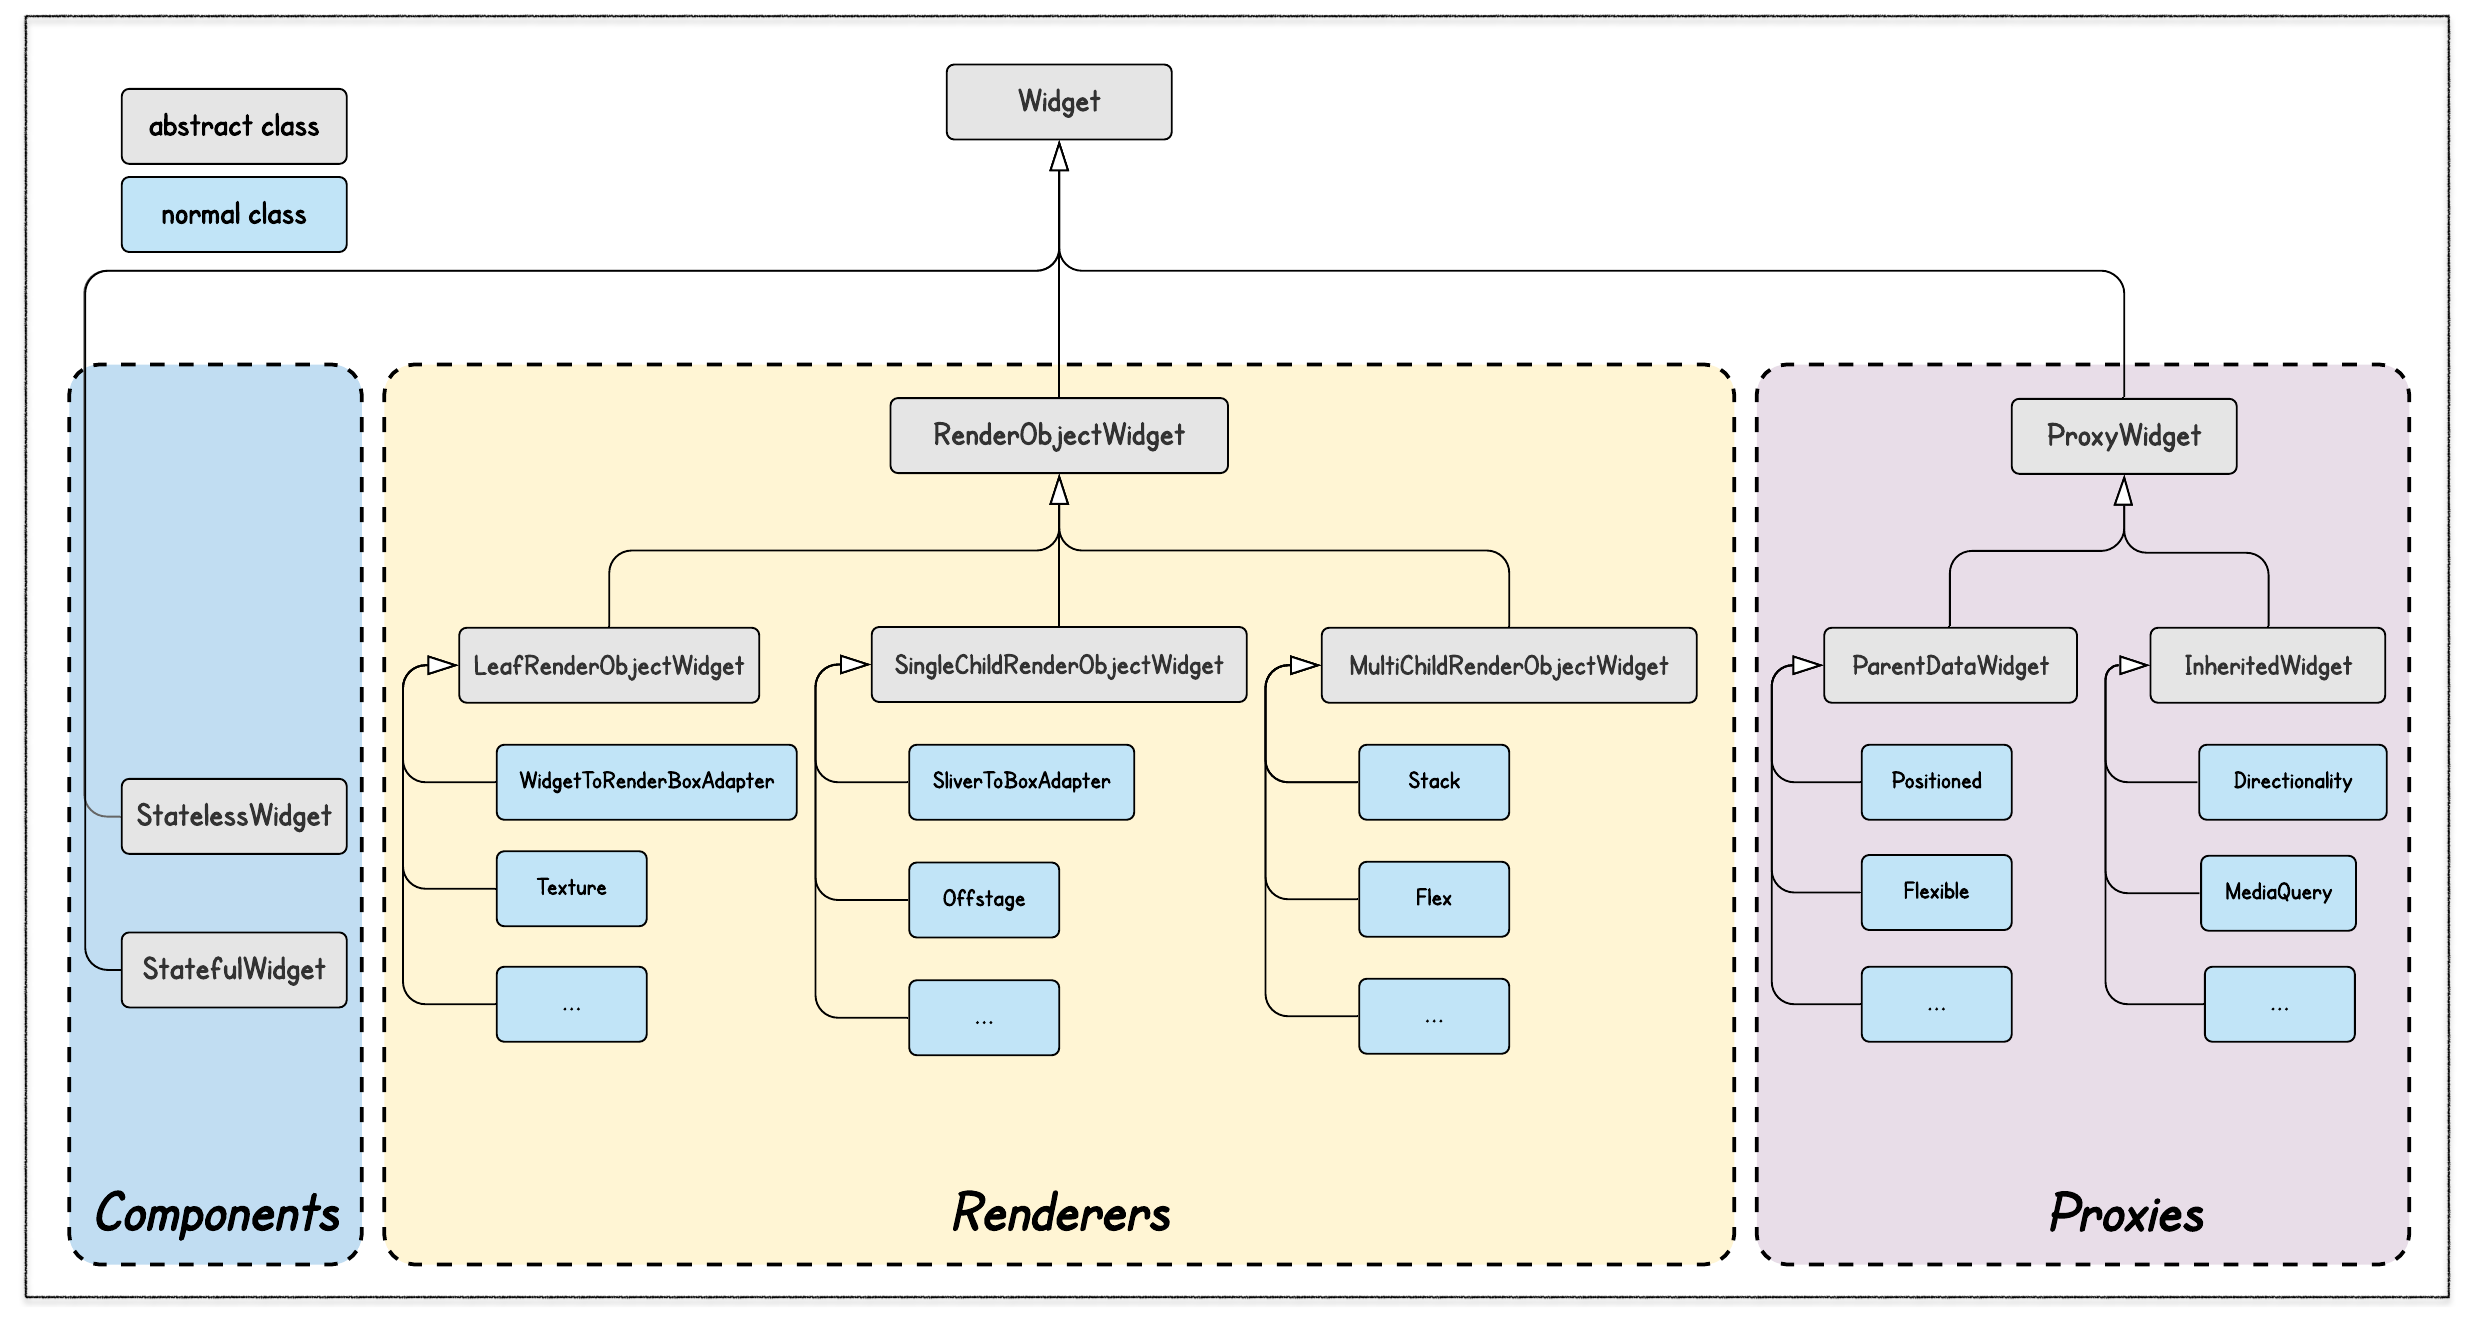
通过前面系列文章的介绍,我们知道 Render-Widget 大致有三类:
- 作为『 Widget Tree 』的叶节点,也是最小的 UI 表达单元,一般继承自
LeafRenderObjectWidget; - 有一个子节点 ( Single Child ),一般继承自
SingleChildRenderObjectWidget; - 有多个子节点 ( Multi Child ),一般继承自
MultiChildRenderObjectWidget。
Widget 间的继承关系如下图:
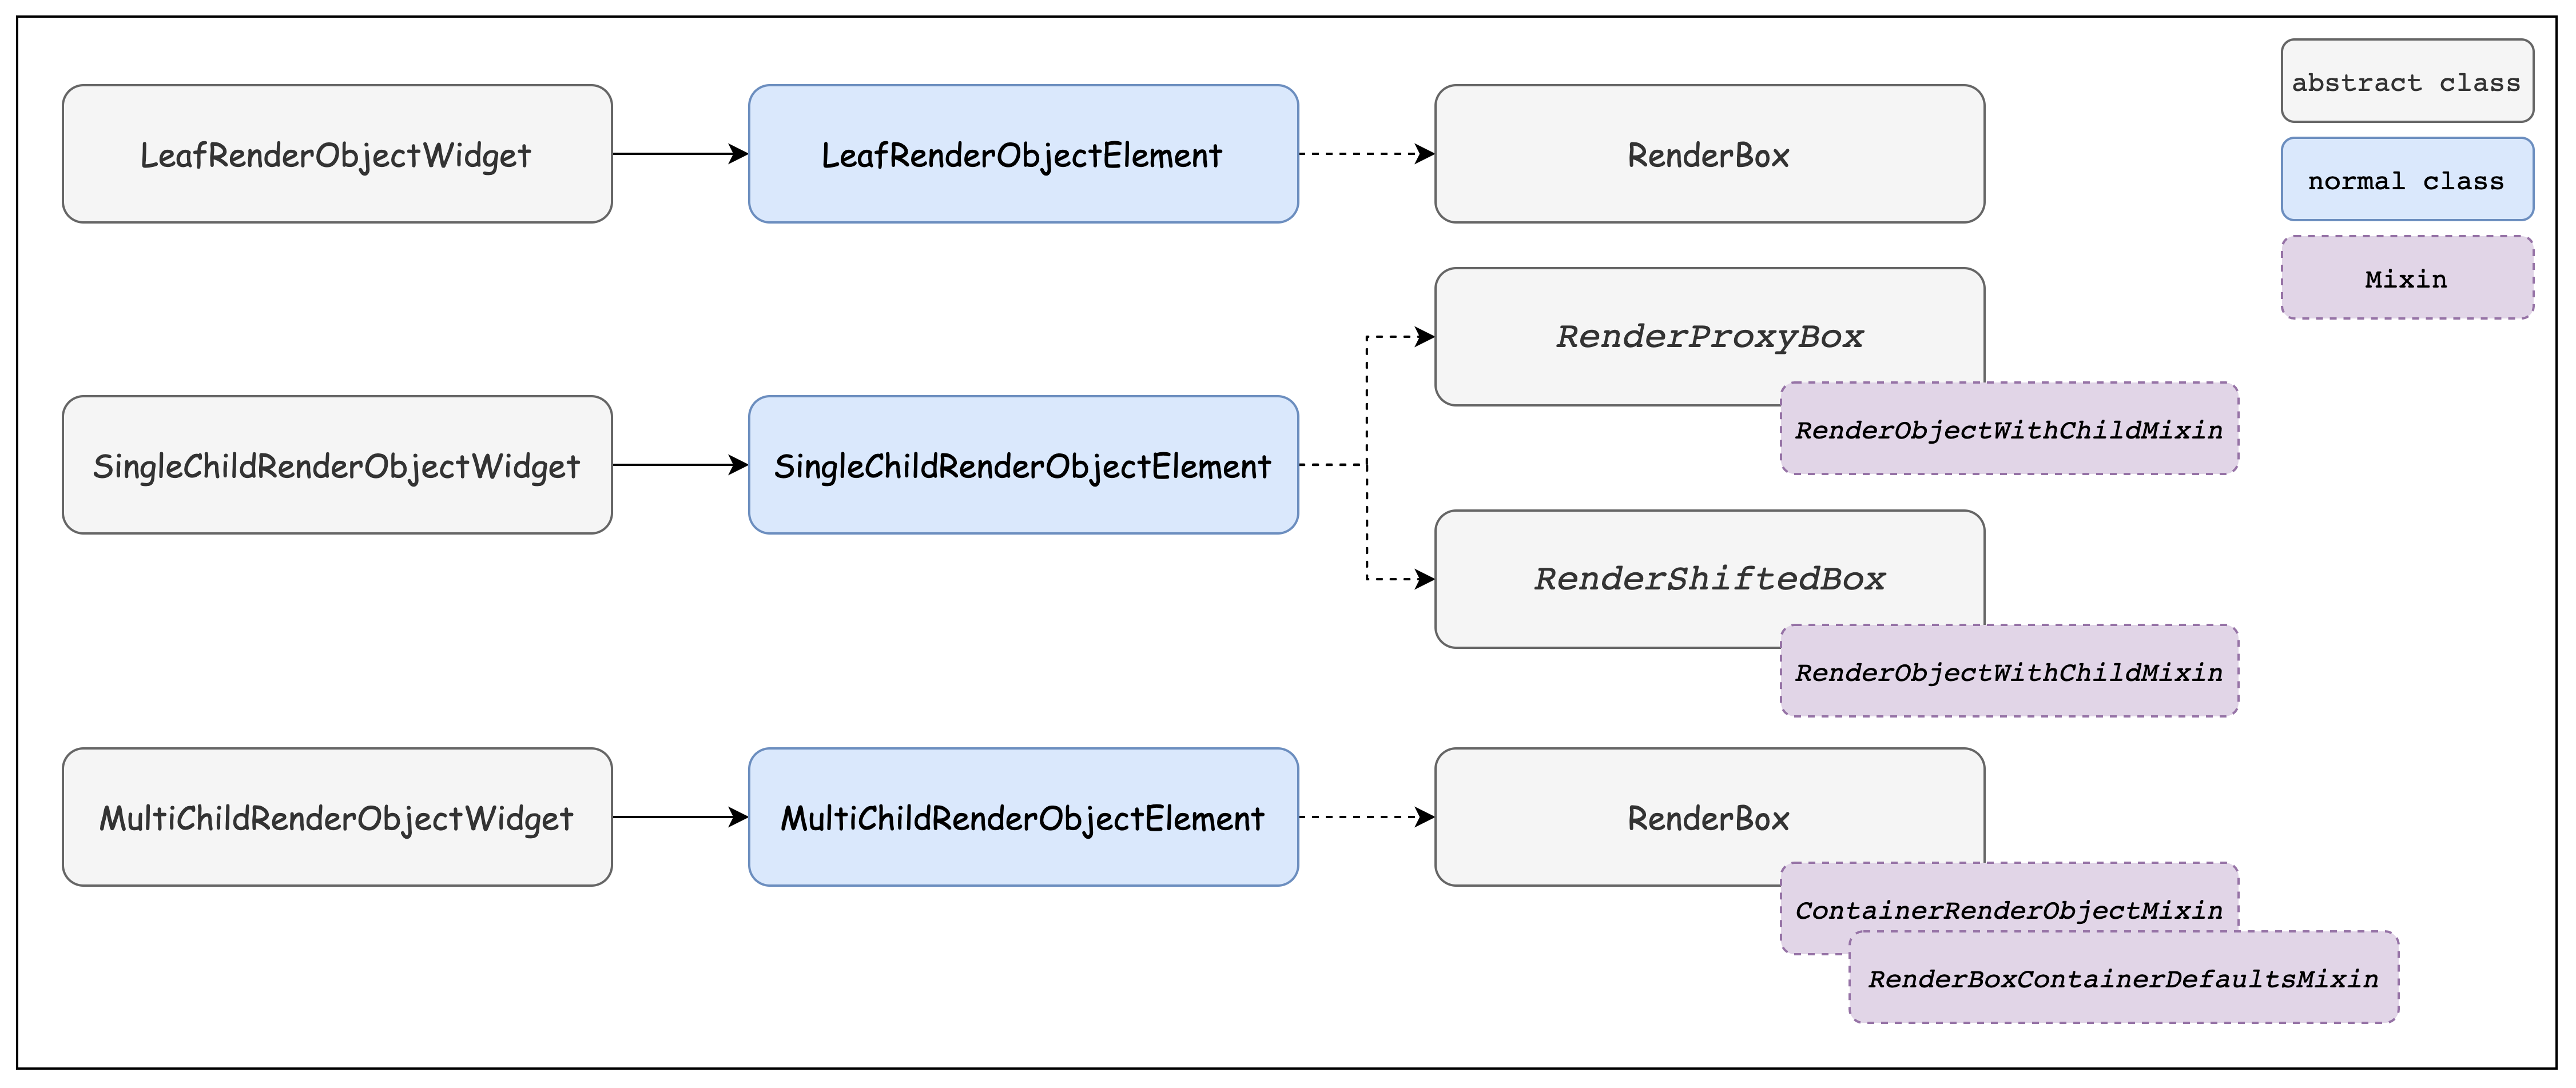
Widget、Element、RenderObject 间的对应关系如下:
其中,Element 与 RenderObject 间用的是虚线,因为它们间的对应关系是基于 RenderBox 系列下的一种建议 (不是强制)。
Sliver 系列就不是基于RenderBox,而是RenderSliver。
通过Render-Widget#createRenderObject方法可以返回任意 RenderObject (如果你愿意)。
对于RenderBox系列来说,如果要自定义子类,根据自定义子类子节点模型的不同需要有不同的处理:
- 自定义子类本身是『 Render Tree 』的叶子节点,一般直接继承自
RenderBox; - 有一个子节点 (Single Child),且子节点属于
RenderBox系列:- 如果其自身的 size 完全 match 子节点的 size,则可以选择继承自
RenderProxyBox(如:RenderOffstage); - 如果其自身的 size 大于子节点的 size,则可以选择继承自
RenderShiftedBox(如:RenderPadding);
- 如果其自身的 size 完全 match 子节点的 size,则可以选择继承自
- 有一个子节点 (Single Child),但子节点不属于
RenderBox系列,自定义子类可以 mixinRenderObjectWithChildMixin,其提供了管理一个子节点的模型; - 有多个子节点 (Multi Child),自定义子类可以 mixin
ContainerRenderObjectMixin、RenderBoxContainerDefaultsMixin,前者提供了管理多个子节点的模型,后者提供了基于ContainerRenderObjectMixin的一些默认实现。
下面,我们一步步地来实现上面提到的评分组件。
Custom Leaf Render Widget
首先,我们来实现评分组件里的五星部分 (ScoreStar Widget):
LeafRenderObjectWidget
ScoreStar作为叶子节点,继承自LeafRenderObjectWidget,并实现了2个重要方法:createRenderObject、updateRenderObject:1
2
3
4
5
6
7
8
9
10
11
12
13
14
15
16
17
18
19
20class ScoreStar extends LeafRenderObjectWidget {
final Color backgroundColor;
final Color foregroundColor;
final double score;
ScoreStar(this.backgroundColor, this.foregroundColor, this.score);
RenderObject createRenderObject(BuildContext context) {
return RenderScoreStar(backgroundColor, foregroundColor, score);
}
void updateRenderObject(BuildContext context, covariant RenderScoreStar renderObject) {
renderObject
..backgroundColor = backgroundColor
..foregroundColor = foregroundColor
..score = score;
}
}
其中,updateRenderObject方法会在 Widget re-build 时调用,用于更新复用的 Render Object 的属性。
在本例中,score会随着用户点击不同的区域而变化,就需要通过updateRenderObject方法来更新RenderScoreStar#score,以便刷新 UI。
Leaf Render Object
从上一小节ScoreStar#createRenderObject可知,ScoreStar 对应的 Render Object 是RenderScoreStar。RenderScoreStar继承自RenderBox。
如下代码:
- 在
socre setter中调用了markNeedsPaint方法,以便在score变化后及时 re-paint (由于 socre 变化不会引起 layout 变化,故此处只需调用markNeedsPaint,若会引起 layout 变化,则需要调用markNeedsLayout); - 关于
sizedByParent,在该例子中设为trueorfalse都可以,因为RenderScoreStar#size完全由constraints决定:- 从性能角度考虑,
sizedByParent应设为true,以便满足RepaintBoundary的条件 (详情请参见[ 深入浅出 Flutter Framework 之 RenderObject ] ); - 若
sizedByParent设为true,需要重写performResize方法来计算 size,由于RenderScoreStar没有 layout 操作需要执行,故不需要重写performLayout; - 若
sizedByParent设为false,则需要重写performLayout,并在该方法中完成 size 的计算; 22~30、32~40两个代码片段随便使用哪个都可以。
- 从性能角度考虑,
- 关于IntrinsicWidth/Height,若重写了
performLayout方法,则进而需要重写以下四个方法:double computeMaxIntrinsicWidth(double height):用于计算一个最小宽度(没错,是最小宽度),在最终 size.width 超过该宽度时,也不会减少 size.height (如,对 text 排版,将 text 排成一行需要的最小宽度就是这里的 MaxIntrinsicWidth,因为再增加宽度也不会减少 text 的高度);double computeMinIntrinsicWidth(double height):排版需要的最小宽度,若小于这个宽度内容就会被裁剪;computeMinIntrinsicHeight、computeMaxIntrinsicHeight与上面介绍的computeMinIntrinsicWidth、computeMaxIntrinsicWidth类似,不再赘述;- 在一些特殊 RenderObject 排版时才会用到这些方法,在此我们根据 constraints 简单计算了一下。
- 为了响应点击事件,重写
hitTestSelf方法,并返回true,表示该 Render Object 需要响应用户事件; - 关于
paint方法中五角星 ★★★★★ 的绘制:- 对于背景 ★★★★★,设置好 path 后,直接通过
context.canvas.drawPath绘制即可; - 对于前景 ★★★★★,先通过
context.pushClipRect对画布进行裁剪 ( rect.width 由 score 决定 ),再行绘制。
- 对于背景 ★★★★★,设置好 path 后,直接通过
1 | // 为了缩减篇幅,精简了部分代码 |
至此,RenderScoreStar基本完成,完整代码请参见 [ Github:Score ]
动态评分
如下图,我们希望评分组件不仅能展示分数,还能评分:
在 Flutter UI 中,一个重要的思想就是:『 组合 』。
为了实现上图所示效果,只需组合StatefulWidget +ScoreStar即可:1
2
3
4
5
6
7
8
9
10
11
12
13
14
15
16
17
18
19
20
21
22
23
24
25
26
27
28
29
30
31
32
33
34
35
36
37
38
39
40
41
42
43
44
45
46
47
48
49
50
51
52
53
54
55
56
57typedef ScoreCallback = void Function(double score);
class Score extends StatefulWidget {
final double score;
final ScoreCallback callback;
const Score({Key key, this.score = 0, this.callback}) : super(key: key);
_ScoreState createState() => _ScoreState();
}
class _ScoreState extends State<Score> {
double score;
void initState() {
super.initState();
score = widget.score ?? 0;
}
void didUpdateWidget(Score oldWidget) {
super.didUpdateWidget(oldWidget);
score = widget.score ?? 0;
}
Widget build(BuildContext context) {
void _changeScore(Offset offset) {
Size _size = context.size;
double offsetX = min(offset.dx, _size.width);
offsetX = max(0, offsetX);
setState(() {
score = double.parse(((offsetX / _size.width) * 5).toStringAsFixed(1));
});
if (widget.callback != null) {
widget.callback(score);
}
}
return GestureDetector(
child: ScoreStar(Colors.grey, Colors.amber, score),
onTapDown: (TapDownDetails details) {
_changeScore(details.localPosition);
},
onLongPressMoveUpdate:(LongPressMoveUpdateDetails details) {
_changeScore(details.localPosition);
},
);
}
}
代码比较简单,就不赘述了。
其中的关键还是上节介绍的RenderScoreStar#hitTestSelf需要返回true。
Custom MultiChild RenderObject Widget

我们希望通过自定义 MultiChild RenderObject Widget 实现如上图所示的效果。
没错,就是加了一个显示分数的 Text。
本来,这完全没必要通过自定义 MultiChild RenderObject Widget 来实现,一般的 Widget 组合即可。
我们只是为了实践自定义 MultiChild RenderObject Widget 才这么做的。
MultiChildRenderObjectWidget
RichScore继承自MultiChildRenderObjectWidget。
在其初始化方法中,向父类传递了2个 children:Score、Text。
重写了createRenderObject方法,以便返回RenderRichScore实例。
由于RenderRichScore没有属性,故无需重写updateRenderObject方法。
1 | class RichScore extends MultiChildRenderObjectWidget { |
RichScoreParentData
还记得 ParentData 吗?
在『 深入浅出 Flutter Framework 之 Widget 』中有过简单介绍。
对于含有子节点的 RenderObject,一般都需要自定义自己的 ParentData 子类,用于辅助 layout。1
2
3class RichScoreParentData extends ContainerBoxParentData<RenderBox> {
double scoreTextWidth;
}
RichScoreParentData继承自ContainerBoxParentData:1
2
3
4
5
6/// Abstract ParentData subclass for RenderBox subclasses that want the
/// ContainerRenderObjectMixin.
///
/// This is a convenience class that mixes in the relevant classes with
/// the relevant type arguments.
abstract class ContainerBoxParentData<ChildType extends RenderObject> extends BoxParentData with ContainerParentDataMixin<ChildType> { }
ContainerBoxParentData是抽象类,但其 mixinContainerParentDataMixin:1
2
3
4
5
6
7/// Parent data to support a doubly-linked list of children.
mixin ContainerParentDataMixin<ChildType extends RenderObject> on ParentData {
/// The previous sibling in the parent's child list.
ChildType previousSibling;
/// The next sibling in the parent's child list.
ChildType nextSibling;
}
ContainerParentDataMixin在子节点间提供了双向链接的支持。
在RichScoreParentData中定义了唯一一个属性:scoreTextWidth,其作用在后面再介绍。
MultiChild RenderObject
RenderRichScore继承自RenderBox并 minix 了ContainerRenderObjectMixin以及RenderBoxContainerDefaultsMixin:
- 由于
RenderRichScore#size受子节点的影响,即不完全由 Constraints 决定,故sizedByParent设为false,同时在调用子节点的layout方法时parentUsesSize参数需设为true(下面代码第40、55行); - 由于其子节点 (
RenderScoreStar)需要响应用户事件,故重写了hitTestChildren方法; - 在
performLayout方法中,完成了所有子节点的排版、设置相应的 ParentData 并计算出了 size; - 对于有子节点的 RenderObject 需要重写
computeDistanceToActualBaseline方法,这里我们用了RenderBoxContainerDefaultsMixin提供的默认实现; paint方法的功能很简单,依次绘制每个子节点(defaultPaint由RenderBoxContainerDefaultsMixin提供);setupParentData用于给子节点设置parentData。
1 | class RenderRichScore extends RenderBox with ContainerRenderObjectMixin<RenderBox, RichScoreParentData>, |
RichScoreParentData#scoreTextWidth
上面我们提到RichScoreParentData有唯一一个属性:scoreTextWidth。
那么它的作用是啥呢?
根据RenderRichScore的排版算法,先计算 text 的宽度,★★★★★ 的宽度等于 constraints.biggest.width - textWidth。
这个算法有点小问题:
由于 textWidth 会因分数的不同,而有细微的差异,最终导致 ★★★★★ 有点闪烁。
为了解决这个问题,我们将 textWidth 的宽度固定为首次计算的 text 宽度+10,并将其存储在RichScoreParentData中(上述代码第42~47行)。
这种解决方法不一定是最好的,这里主要是演示一下 ParentData 的作用。
至此,自定义 MultiChild RenderObject 基本完成了。
小结
本文通过实现评分组件,逐步实践了如何自定义 Leaf Render Widget 以及 MultiChild Render Widget。
在这过程中,自定义了 Widget 以及 Render Object,但并没有涉及 Element。
原因是 Element 作为 Widget 与 Render Object 间的桥梁,逻辑相对内聚、独立。
当自定义 Widget 继承自LeafRenderObjectWidget、SingleChildRenderObjectWidget或MultiChildRenderObjectWidget时,一般不用自定义 Element。
自定义 Leaf Render Widget,一般需要以下步骤:
- 自定义 Widget 继承自
LeafRenderObjectWidget,并重写createRenderObject、updateRenderObject方法; - 自定义 Render Object 继承自
RenderBox:- 确定
sizedByParent为trueorfalse; - 为
false,重写performLayout方法,执行 layout 并计算 size; - 为
true,重写performResize方法计算 size、重写performLayout方法执行 layout (若需要); - 如果重写了
performLayout方法,则需进一步重写computeMax/MinIntrinsicWidth/Height系列方法; - 如需处理用户事件,重写
hitTestSelf方法; - 重写
paint方法,完成最终的绘制。
- 确定
自定义 MultiChild Render Widget,一般需要以下步骤:
- 自定义 Widget 继承自
MultiChildRenderObjectWidget,并重写createRenderObject、updateRenderObject方法; - 自定义 Render Object 继承自
RenderBox,并 minixContainerRenderObjectMixin、RenderBoxContainerDefaultsMixin:- 确定
sizedByParent为trueorfalse; - 为
false,重写performLayout方法,对子节点逐个执行 layout 操作并计算 size; - 为
true,重写performResize方法计算 size、重写performLayout方法执行 layout; - 如果重写了
performLayout方法,则需进一步重写computeMax/MinIntrinsicWidth/Height系列方法; - 重写
computeDistanceToActualBaseline方法计算 baseline; - 如需处理用户事件,重写
hitTestSelf或/和hitTestChildren方法; - 自定义 ContainerBoxParentData 子类,用于存储 layout 过程中需要的辅助信息;
- 重写
setupParentData方法,为子节点设置 ParentData; - 重写
paint方法,对子节点逐个执行 paint 操作。
- 确定
『 深入浅出 Flutter Framework 』系列文章至此全部完成!
这一系列文章围绕 Widget、Element 以及 RenderObject 展开讨论,对 Flutter Framework 有了一个简单的认识。
在此过程中对相关的 BuildOwner、PaintingContext、Layer 以及 PipelineOwner 等也进行了一定的讨论。