本文是『 深入浅出 Flutter Framework 』系列文章的第四篇,主要目的是为后面介绍 RenderObject 作准备。
文章对 PaintingContext 进行了较详细的分析,主要包括在 Rendering Pipeline 中 PaintingContext 是如何配合 RenderObject 进行绘制的,同时对一些基础概念进行了简要的介绍(如:Canvas、Picture、PictureRecorder、SceneBuilder 以及 Scene 等)。
©原创文章,转载请注明出处!
本系列文章将深入 Flutter Framework 内部逐步去分析其核心概念和流程,主要包括:
『 深入浅出 Flutter Framework 之 Widget 』
『 深入浅出 Flutter Framework 之 BuildOwner 』
『 深入浅出 Flutter Framework 之 Element 』
『 深入浅出 Flutter Framework 之 PaintingContext 』
『 深入浅出 Flutter Framework 之 Layer 』
『 深入浅出 Flutter Framework 之 PipelineOwner 』
『 深入浅出 Flutter Framework 之 RenderObejct 』
『 深入浅出 Flutter Framework 之自定义渲染型 Widget 』
Overview
『 Widget 』—『 Element 』—『 RenderObject 』可称之为 Flutter Framework『三剑客』,其中 Widget、Element 都已介绍过,而 RenderObject 在这三者中属于最核心、最复杂的,涉及 Layout、Paint 等核心流程。
为了更好、更流畅地去理解 RenderObject,在正式介绍之前,需要做些准备工作,本文介绍的 PaintingContext 在 RenderObject 的绘制流程上扮演了重要角色。
『Painting Context』,其名称已说明了一些事情:绘制上下文,最简单的理解就是为绘制操作 (Paint) 提供了场所或者说环境 (上下文)。
其主要职责包括:
- 在绘制流程中按需引入新的 Layer(主要依据 Repaint Boundary、need compositing);
- 维护「Layer Tree」,每个 PaintingContext 实例都会生成一棵 Layer Sub Tree;
- 管理 Canvas,对底层细节进行抽象、封装。
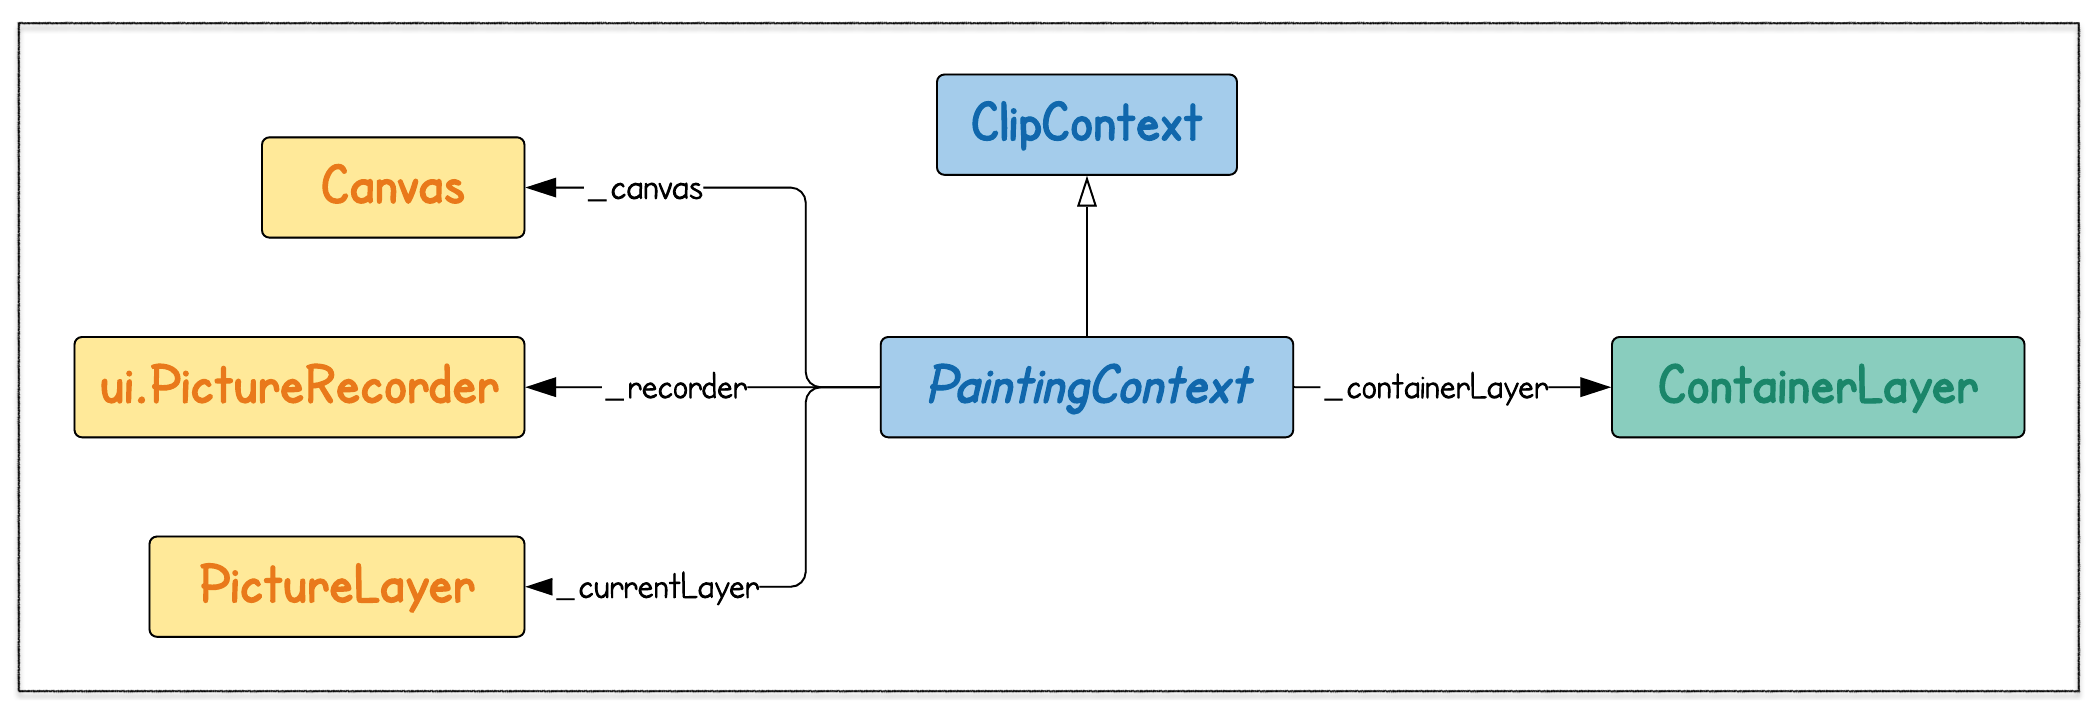
如上图:
PaintingContext继承自ClipContext,ClipContext是抽象类,主要提供了几个与裁剪 (Clip) 有关的辅助方法;PictureLayer _currentLayer、ui.PictureRecorder _recorder以及Canvas _canvas用于具体的绘制操作;ContainerLayer _containerLayer,「Layer Subtree」的根节点,由PaintingContext构造函数传入,一般传入的是RenderObject._layer。RenderObject 与 Layer 是多对一的关系,即多个 RenderObject 绘制在一个 Layer 上。
基础概念
在上一小节中提及一些基础的概念,本小节对它们逐一进行简要介绍。
Canvas
Canvas是 Engine(C++) 层到 Framework(Dart) 层的桥接,真正的功能在 Engine 层实现。
下文将要出现的
Picture、PictureRecorder、SceneBuilder以及SceneBuilder都属于Engine(C++) 层到 Framework(Dart) 层的桥接。
Canvas 向 Framework 层曝露了与绘制相关的基础接口,如:draw*、clip*、transform以及scale等,RenderObject 正是通过这些基础接口完成绘制任务的。
通过这套接口进行的所有操作都将被
PictureRecorder记录下来。
1 | Canvas(PictureRecorder recorder, [ Rect cullRect ]){} |
如上,在Canvas初始化时需要指定PictureRecorder,用于记录所有的「graphical operations」。
除了正常的绘制操作(draw*),Canvas 还支持矩阵变换(transformation matrix)、区域裁剪(clip region),它们将作用于其后在该 Canvas 上进行的所有绘制操作。
下面列举部分方法,以便有更直观的感受:1
2
3
4
5
6
7
8
9
10
11
12
13void scale(double sx, [double sy]);
void rotate(double radians) native;
void transform(Float64List matrix4);
void clipRect(Rect rect, { ClipOp clipOp = ClipOp.intersect, bool doAntiAlias = true });
void clipPath(Path path, {bool doAntiAlias = true});
void drawColor(Color color, BlendMode blendMode);
void drawLine(Offset p1, Offset p2, Paint paint);
void drawRect(Rect rect, Paint paint);
void drawCircle(Offset c, double radius, Paint paint);
void drawImage(Image image, Offset p, Paint paint);
void drawParagraph(Paragraph paragraph, Offset offset);
Picture
其本质是一系列「graphical operations」的集合,对 Framework 层透明。Future<Image> toImage(int width, int height),通过toImage方法可以将其记录的所有操作经光栅化后生成Image对象。
PictureRecorder
其主要作用是记录在Canvas上执行的「graphical operations」,通过Picture#endRecording最终生成Picture。
Scene
同样对 Framework 层透明,是一系列 Picture、Texture 合成的结果。
An opaque object representing a composited scene.
UI 帧刷新时,在 Rendering Pipeline 中 Flutter UI 经 build、layout、paint 等步骤后最终生成 Scene。
其后通过window.render将该 Scene 送入 Engine 层,最终经 GPU 光栅化后显示在屏幕上。
SceneBuilder
用于将多个图层(Layer)、Picture、Texture 合成为 Scene。1
2void addPicture(Offset offset, Picture picture, { bool isComplexHint = false, bool willChangeHint = false });
void addTexture(int textureId, { Offset offset = Offset.zero, double width = 0.0, double height = 0.0 , bool freeze = false});
通过addPicture、addTexture可以引入要合成的 Picture、Texture。
同时,SceneBuilder 还会维护一个图形操作 stack:1
2
3
4
5pushTransform
pushOffset
pushClipRect
...
pop
这些操作主要用于OffsetLayer、ClipRectLayer等。
是不是觉得很抽象,晕乎乎的!
下面通过一个小例子将它们串起来,真实感受一下。
小例子
1 | void main() { |
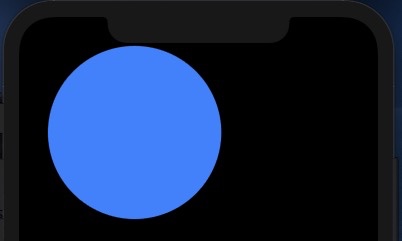
通过直接操作 Canvas,我们在屏幕上画了一个⭕️。
仅仅是为了演示,在日常开发中并不需要直接操作这些基础 API。
绘制流程
本小节介绍的绘制流程,仅局限于 PaintingContext 周围,更完整的流程将在介绍 RenderObject 时进行分析。
PaintingContext 与 RenderObject 是什么关系?
从『类间关系』角度看,它们之间是依赖关系,即 RenderObject 依赖于 PaintingContext —— PaintingContext 作为参数出现在 RenderObject 的绘制方法中。
也就是说,PaintingContext 是一次性的,每次执行 Paint 时都会生成对应的 PaintingContext,当绘制完成时其生命周期也随之结束。
PaintingContext 在 RenderObject 的绘制过程中的作用如下图所示: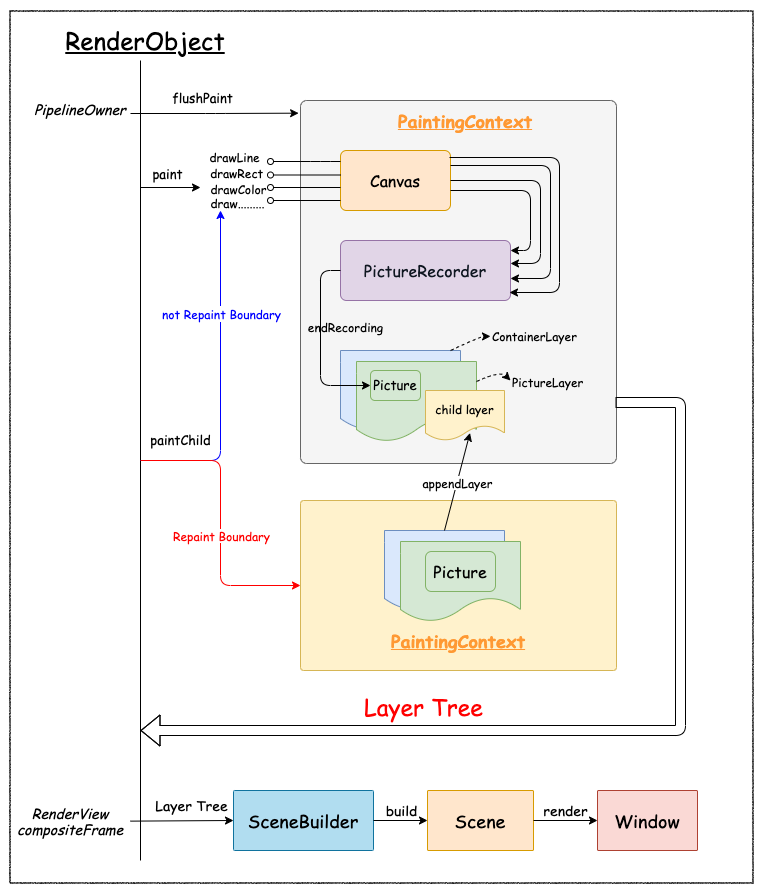
- 在 UI Frame 刷新时,通过
RendererBinding#drawFrame->PipelineOwner#flushPaint触发RenderObject#paint; RenderObject#paint调用PaintingContext.canvas提供的图形操作接口(draw*、clip*、transform等)完成绘制任务;- 上述绘制操作被 PictureRecorder 记录下来,在绘制结束时生成 picture,并被添加到 PictureLayer (_currentLayer)上;
- 随后,RenderObject 通过
PaintingContext#paintChild递归地绘制子节点(child renderobject,如有); - 在绘制子节点时,根据子节点是否是「Repaint Boundary」而采用不同的策略:
- 是「Repaint Boundary」— 为子节点生成新的 PaintingContext,从而子节点可以独立进行绘制,绘制结果就是一颗「Layer subTree」,最后将该子树 append 到父节点生成的「Layer Tree」上;
- 不是「Repaint Boundary」— 子节点直接绘制在当前
PaintingContext.canvas上,即 RenderObject 与 Layer 是多对一的关系。
- 整个绘制流程结束时就得到了一棵「Layer Tree」,其后通过 SceneBuilder 生成 Scene,再经
window.render送入 Engine 层,最终 GPU 对其进行光栅化处理,显示在屏幕上。Repaint Boundary 的概念将在介绍 RenderObject 时重点分析。
上述流程中,起到关键作用的几个方法:1
2
3
4
5
6
7
8
9
10
11
12
13
14
15
16
17
18
19
20
21
22
23
24
25
26
27
28
29
30
31
32
33
34
35Canvas get canvas {
if (_canvas == null)
_startRecording();
return _canvas;
}
void _startRecording() {
// 在当前 Canvas 上进行的图形操作生成的 Picture 将添加到该 layer 上
//
_currentLayer = PictureLayer(estimatedBounds);
_recorder = ui.PictureRecorder();
// 初始化 Canvas,传入_recorder
//
_canvas = Canvas(_recorder);
// 将_currentLayer插入以_containerLayer为根节点的子树上
//
_containerLayer.append(_currentLayer);
}
void stopRecordingIfNeeded() {
// 在停止记录时,将结果 picture 加到 _currentLayer 上
//
_currentLayer.picture = _recorder.endRecording();
// 注意!
// 此时,_currentLayer、_recorder、_canvas 被释放,
// 此后,若还要通过当前 PaintingContext 进行绘制,则会生成新的 _currentLayer、_recorder、_canvas
// 即在 PaintingContext 的生命周期内 _canvas 可能会变
//
_currentLayer = null;
_recorder = null;
_canvas = null;
}
Compositing
Compositing,合成,属于 Rendering Pipeline 中的一环,表示是否要生成新的 Layer 来实现某些特定的图形效果。
RenderObject.needCompositing表示该 RenderObject 是否需要合成,即在paint方法中是否需要生成新的 Layer。
更详细的信息将在介绍 RenderObject 是进行分析。
通常 RenderObject 会通过PaintingContext#push*来处理 Compositing:1
2
3
4
5
6
7
8
9
10
11
12
13
14
15
16
17
18
19
20
21
22
23
24
25
26
27
28
29
30
31
32
33
34
35
36
37
38
39
40
41
42void pushLayer(ContainerLayer childLayer, PaintingContextCallback painter, Offset offset, { Rect childPaintBounds }) {
// 注意!
// 在 append sub layer 前先终止现有的绘制操作
// stopRecordingIfNeeded 所执行的操作见上文
//
stopRecordingIfNeeded();
appendLayer(childLayer);
// 为 childLayer 创建新的 PaintingContext,以便独立进行绘制操作
//
final PaintingContext childContext = createChildContext(childLayer, childPaintBounds ?? estimatedBounds);
painter(childContext, offset);
childContext.stopRecordingIfNeeded();
}
PaintingContext createChildContext(ContainerLayer childLayer, Rect bounds) {
return PaintingContext(childLayer, bounds);
}
// needsCompositing 参数一般来自 RenderObject.needCompositing
//
ClipRectLayer pushClipRect(bool needsCompositing, Offset offset, Rect clipRect, PaintingContextCallback painter, { Clip clipBehavior = Clip.hardEdge, ClipRectLayer oldLayer }) {
final Rect offsetClipRect = clipRect.shift(offset);
if (needsCompositing) {
// 在需要合成时,创建新 Layer
//
final ClipRectLayer layer = oldLayer ?? ClipRectLayer();
layer
..clipRect = offsetClipRect
..clipBehavior = clipBehavior;
// 将新 layer 添加到 layer tree 上,并在其上完成绘制
//
pushLayer(layer, painter, offset, childPaintBounds: offsetClipRect);
return layer;
} else {
// 否则在当前 Canvas 上进行裁剪、绘制
//
clipRectAndPaint(offsetClipRect, clipBehavior, offsetClipRect, () => painter(this, offset));
return null;
}
}
如上,pushClipRect在needsCompositing为true时,创建了新 Layer 并在其上进行裁剪、绘制,否则在当前 Canvas 上进行裁剪、绘制。
例子
下面,我们再通过一个简单的例子将上面的内容串一下:1
2
3
4
5
6
7
8
9
10
11
12
13
14
15
16
17
18
19
20
21
22
23
24
25
26
27
28
29
30
31
32
33
34
35
36
37
38
39
40
41
42void main() {
ContainerLayer containerLayer = ContainerLayer();
PaintingContext paintingContext = PaintingContext(containerLayer, Rect.zero);
Paint circle1Paint= Paint();
circle1Paint.color = Colors.blue;
// 注释1
// paintingContext.canvas.save();
// 对画布进行裁剪
//
paintingContext.canvas.clipRect(Rect.fromCenter(center: Offset(400, 400), width: 280, height: 600));
// 在裁剪后的画布上画一个⭕️
//
paintingContext.canvas.drawCircle(Offset(400, 400), 300, circle1Paint);
// 注释2
// paintingContext.canvas.restore();
void _painter(PaintingContext context, Offset offset) {
Paint circle2Paint = Paint();
circle2Paint.color = Colors.red;
context.canvas.drawCircle(Offset(400, 400), 250, circle2Paint);
}
// 通过 pushClipRect 方法再次执行裁剪
// 注意此处 needsCompositing 参数为 true
//
paintingContext.pushClipRect(true, Offset.zero, Rect.fromCenter(center: Offset(500, 400), width: 200, height: 200), _painter,);
Paint circle3Paint= Paint();
circle3Paint.color = Colors.yellow;
// 再次画一个⭕️
//
paintingContext.canvas.drawCircle(Offset(400, 800), 300, circle3Paint);
paintingContext.stopRecordingIfNeeded();
// 为了减少篇幅,生成 Scene 相关的代码已省略
}
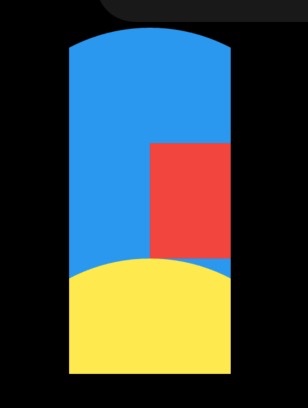
绘制结果如下图所示:
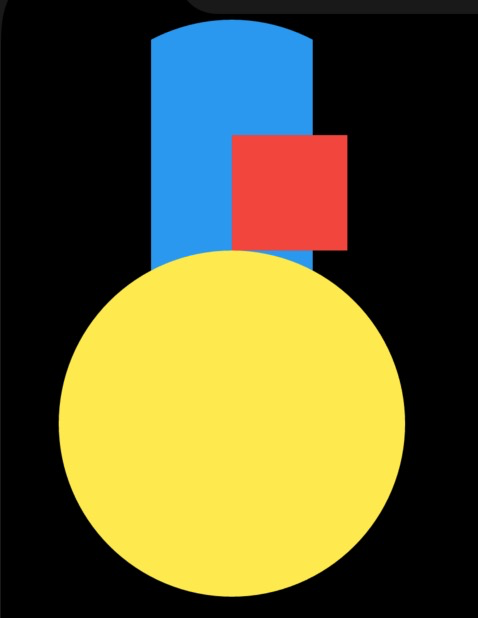
若上述代码中在调用
paintingContext.pushClipRect时,needsCompositing参数为false,则结果如下:
那么,在
needsCompositing参数为false时,如何实现图1的效果呢?很简单,将代码中1、2处的注释去掉即可。
过程就不分析了,兴趣的同学可以自己分析一下。
总结
PaintingContext 在协助 RenderObject 绘制过程中起到重要作用,如:对 Layer Tree 的管理、对 Repaint Boundary、need Compositing 的处理、对基础 api 的封装等。了解了这些对后面理解 RenderObject 有很大的帮助。