本文通过解读 ReactNative 源码,简要分析了 ReactNative 通过 JS 创建、控制 Native 界面的过程。同时,为了完整性,我们也简单介绍了 JSX、 React Element 以及 React Component 等基本概念。
©原创文章,转载请注明出处!
Overview
目前移动端开发模式主要有:Native、Web、Hybrid 三种。其中,由 Web、Hybrid 开发的页面与 Native 有本质的区别,其最终呈现给用户的是 html 页面。
React Native 作为近几年新兴的开发模式,由于具有跨平台、动态更新等特性,备受关注。
Build native mobile apps using JavaScript and React
React Native 官方给出的定义,高度概括了其特征:
- RN 开发的 App 是以 React 为框架,通过 JS 实现业务逻辑;
- 最终开发出来的页面是纯 Native 的(即呈现给用户的是货真价实的 Native 页面)。
RN 如何通过 JS 构造 Natvie 页面,正是本文分析的主题。
JSX & React Element & React Component
在开始前,有必要先简要介绍一下 JSX 、React Element 以及 React Component,三者都是来自 React 框架。
JSX
JSX 可以简单理解为 JavaScript + XML 的语法糖,如:1
2
3
4
5
6
7
8
9
10
11export default class Sample extends Component {
render() {
return (
<View style={styles.container}>
<Text style={styles.welcome}>
Welcome to React Native!
</Text>
</View>
);
}
}
由于 JSX 仅是一种语法糖,将 JSX 打包生成 bundle 时,通过 Babel JSX 会被转换成标准的 JavaScript 语法。上述 JSX 代码转换后如下:1
2
3
4
5
6
7
8
9
10
11
12
13export default class Sample extends Component {
render() {
return React.createElement(
View,
{ style: styles.container },
React.createElement(
Text,
{ style: styles.welcome },
'Welcome to React Native!'
)
);
}
}
通过 『online Babel compiler』可在线实时演示 JSX to JavaScript 的转换。
通过上述转换前后对比可知,JSX 中每个标签都会转换成 React.createElement 调用。
JSX 并不是必须的,可直接调用
React.createElement。当然,更加推荐使用 JSX,因其可以更好、更清晰地表达视图层次结构。另外,JSX 是在打包过程中被转换成标准 JavaScript,因此不会有性能问题。
React Element
Elements are the smallest building blocks of React apps.
Element(元素),是 React 中最小的构建单元,如下:1
const element = <h1>Hello, world</h1>;
React Component
组件 (Component) 在 React 中是一个非常重要的概念,就像在 OOP 世界里一切皆对象,在 React 中一切皆 Component。
Components let you split the UI into independent, reusable pieces, and think about each piece in isolation. ——『React.Component』
React embraces the fact that rendering logic is inherently coupled with other UI logic: how events are handled, how the state changes over time, and how the data is prepared for display. Instead of artificially separating technologies by putting markup and logic in separate files, React separates concerns with loosely coupled units called “components” that contain both.——『Why JSX?』
从 React 官方的这两个描述可以总结一下 React Component 的特征:
- 独立的、可复用的 UI 单元;
- 除了 UI 渲染,根据『Separation of Concerns (SoC)』设计原则,Component 还需要处理其他业务逻辑,如:用户事件、状态变化、数据展示预处理等。
与此相反,在 Native 开发中,为了提高可复用性,强调将 UI 渲染 (View) 与业务逻辑 (ViewModel) 分离,同时用户事件处理需要在 Controller 中完成。而 React Component 其实更强调的是独立与分离。
我们在自定义 Component 时,一般继承自抽象基类React.Component,同时需要实现render()方法。通过render()方法可知,React Component 是由 React Element 构成的。
关于 Component 定义、使用相关的细节问题,在此不再赘述,详情可参考React.Component、Components and Props
在 RN 中,根组件(root components)需要通过AppRegistry#registerComponent方法进行注册。所谓根组件,可以简单理解为 Native to RN 的入口,Native 在加载 RN bundle 之后可通过AppRegistry#runApplication方法运行指定的根组件,从而进入 RN 的世界。
Native UI Components
我们知道,通过 RN 实现的功能最终呈现给用户的是纯 Native 页面,这些 Native 页面实质是通过预定义的 Native UI Component 组装而成的。
因此,更进一步,分析 RN 的渲染机制,就是分析如何通过 JS 组装、控制 Native UI Component 生成 Native 界面。
没错,继续之前,先简要说说 Native UI Components。
iOS MapView example
了解新事物,最简单的方式莫过于从例子入手(来自RN 官方:Native UI Components):
该例子封装一个 iOS MapView 组件给 RN 使用。1
2
3
4
5
6
7
8
9
10
11
12
13
14
15
16
17
18
19
20// Code 1
// RNTMapManager.m
@interface RNTMapManager : RCTViewManager
@end
@implementation RNTMapManager
RCT_EXPORT_MODULE()
- (UIView *)view
{
return [[MKMapView alloc] init];
}
RCT_EXPORT_VIEW_PROPERTY(zoomEnabled, BOOL)
@end
1 | // Code 2 |
如上例所示:
MapView(Native UI Component) 需要通过RNTMapManager(RCTViewManager子类)进行管理;RNTMapManager作为曝露给 RN 的 Native Module,需要添加RCT_EXPORT_MODULE宏;RNTMapManager需要实现- (UIView *)view方法,用于导出其管理的MapView(UI Component);RNTMapManager可以通过RCT_EXPORT_VIEW_PROPERTY宏导出其管理的MapView的属性。
RN 侧,通过requireNativeComponent方法引入 Native UI Component,实际引入的是 Native UI Component Manager。上例中即是RNTMapManager(Code 2 第7行)。
Native UI Component Manager 在命名上必须以
Manager为后缀,在 RN 中引用时省略此后缀(如 Code 2 中第7行所示)。
为了描述方便,后文将 Native UI Component Manager 简称为RCTComponentManager,是RCTViewManager的子类。
Code 2中第16行使用的zoomEnabled即是 Code 1中第19行导出的属性。
RCTUIManager
在前一小节示例中,引入了RCTViewManager,此时有必要介绍一下RCTUIManager。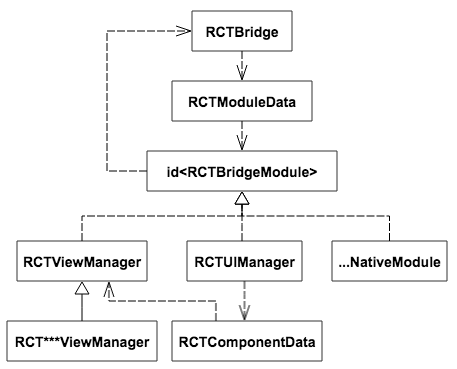
可以看到,RCTViewManager、RCTUIManager都实现了RCTBridgeModule协议,即都是曝露给 JS 的 Native Module。在『ReactNative源码解析——通信机制详解(1/2)』一文中,详细介绍了 RCTBridge 是如何管理 Native Module 的,在此不再赘述。
在 JS to Native 的渲染流程中,RCTUIManager起到重要作用:包括 Native View 的创建、布局、移除等操作都是通过RCTUIManager完成的。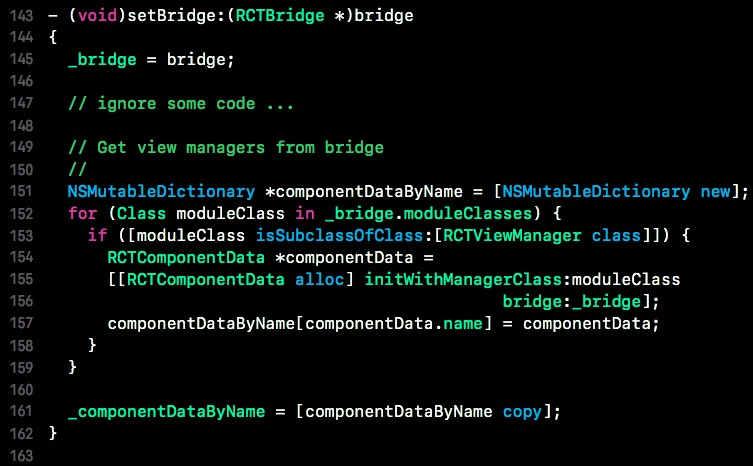
通过上述RCTUIManager#setBridge:方法可知:所有的RCTComponentManager都会以RCTComponentData格式储存在RCTUIManager->_componentDataByName中。
RCTUIManager通过RCTComponentData操作RCTComponentManager,包括创建 component、为 component 设置属性等,具体内容后文会详细介绍。
RCT***View
在阅读 RN 源码过程中,会发现几个名称相似的 『view』:RCTRootView、RCTRootContentView、RCTView、RCTShadowView以及RCTRootShadowView,它们间的关系如下类图所示: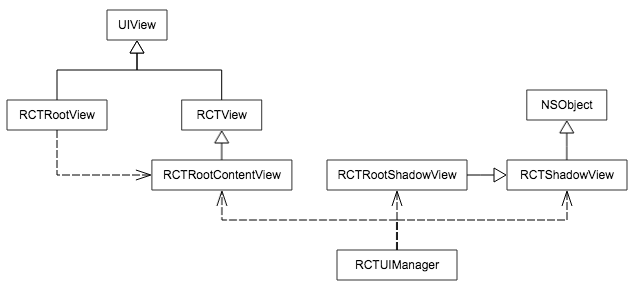
RCTView——在 RN 中一个较基础的类,主要处理了 view 的 clipe、border等基础功能,UI 组件根据需要可继承自它(如:RCTScrollView),也可不继承(如:RCTText);RCTRootView——RN 的入口,也是这几个『view』中唯一曝露给外界的接口。下述引用来自 RN 源码中对RCTRootView的注解。很明显,RCTRootView是『React-managed』view 的载体(root);此外,在屏幕上可以同时有多个RCTRootViews。Native view used to host React-managed views within the app.
Can be used just like any ordinary UIView.
You can have multiple RCTRootViews on screen at once, all controlled by the same JavaScript application.RCTRootContentView——从其名称即可知其特点『root+content view』,其是所有 RN UI 元素的载体,其本身作为 subview 添加到RCTRootView上;RCTShadowView——在 RN 中,每个 UI 组件(view)实例都对应一个RCTShadowView(或其派生类)实例(类似于UIView与CALayer的关系),从上面类图可知,虽然其命名以View结尾,但实质并非 View(继承自NSObject)。其主要功能是通过 facebook-Yoga在子线程(shadow thread)进行布局相关的计算。在实践中,我们发现同一功能,RN 实现的帧率往往比 Native 实现的更好(也就是更流畅),与 RN 通过
RCTShadowView在子线程进行布局计算密不可分。RCTRootShadowView——继承自RCTShadowView,与RCTRootContentView一一对应。
渲染流程
RCTRootView
RCTRootView是 RN 应用(或者说 RN 模块)的入口,分析就从RCTRootView开始。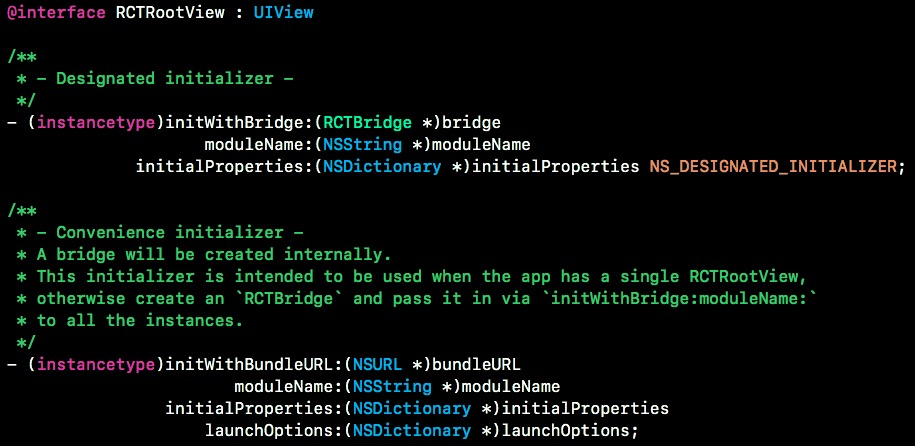
如上图所示,RCTRootView提供了两个 initializer 方法,分别接受 RCTBridge(Designated initializer)以及 JSBundleURL(Convenience initializer)。
在初始化过程中,RCTBridge(RCTCxxBridge)异步加 JS Bundle,加载完成后会以通知(RCTJavaScriptDidLoadNotification)的形式告知RCTRootView: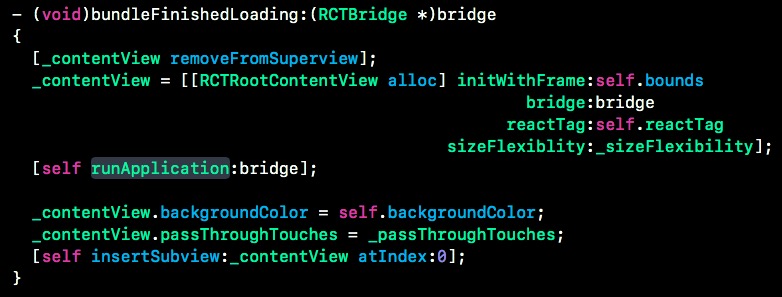
在RCTRootView#bundleFinishedLoading:方法中,创建了RCTRootContentView并作为 subview 添加到RCTRootView上,同时调用了runApplication方法: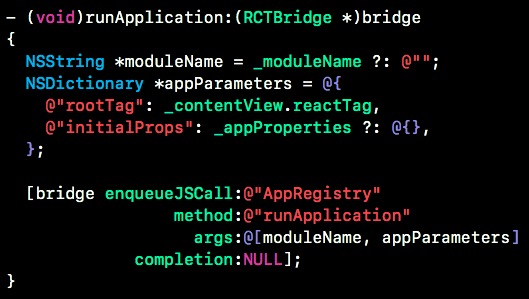
RCTRootView#runApplication: 方法以 _moduleName、_contentView.reactTag 以及 _appProperties为参数调用 JS 模块AppRegistry的runApplication方法。
对AppRegistry不陌生吧^_^,『前文讲过,RN root components 都需要通过AppRegistry模块的registerComponent方法进行注册』。
AppRegistry
我们先从 component 注册说起:1
2
3
4
5
6
7
8
9
10
11
12
13// Code 3
export default class App extends Component<Props> {
render() {
return (
<View style={styles.container}>
<Text style={styles.welcome}>
Welcome to React Native!
</Text>
</View>
);
}
}
AppRegistry.registerComponent('RNDemo', () => App);
上述 Code 3定义了一个组件App,并通过AppRegistry.registerComponent方法进行了注册,使其成为根组件 (即可以在 Native 中直接调用)。1
2
3
4
5
6
7
8
9
10
11
12
13
14
15
16
17// Code 4 (代码有删减,下同)
registerComponent(
appKey: string,
componentProvider: ComponentProvider,
): string {
runnables[appKey] = {
componentProvider,
run: (appParameters) =>
renderApplication(
componentProviderInstrumentationHook(componentProvider),
appParameters.initialProps,
appParameters.rootTag,
wrapperComponentProvider && wrapperComponentProvider(appParameters),
)
};
return appKey;
}
通过 Code 4可知,组件最终存放在了组件注册表runnables中,其中最关键的信息是以run为 key 存储的箭头方法(第8~14行),即最终对renderApplication方法的调用。1
2
3
4// Code 5
runApplication(appKey: string, appParameters: any): void {
runnables[appKey].run(appParameters);
},
在RCTRootView#runApplication: 方法中调用的AppRegistry#runApplication方法更加简单了,直接从组件注册表中取出相应的方法执行(最终调用renderApplication方法)。
定义根组件时调用
AppRegistry.registerComponent方法的 key 与在RCTRootView#runApplication:中调用AppRegistry#runApplication时的 key 需要一致(在例子中都是RNDemo)。
1 | // Code 6 |
renderApplication最终调用了ReactNative.render,注意其参数:并不是直接使用我们传入的RootComponent,而是在其外面包了一层——AppContainer。
AppContainer是一个 React Component,像 debug 工具 Inspector、YellowBox 以及我们最不愿看到的出错时的红色界面都是在该组件中加载的。
还记得,前文讲过,JSX 语法中的标签在打包生成 bundle 时会被转换成对React.createElement方法的调用吗?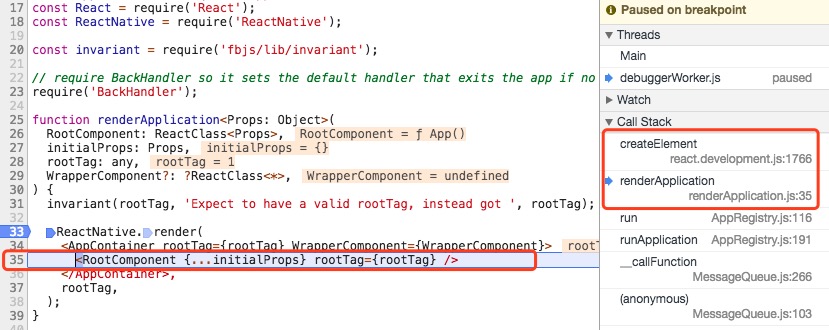
通过上图的 debug 堆栈再次证明了这一点,ReactNative#render方法的第35行,原本是通过 JSX 语法形式对RootComponent的引用,但如右侧堆栈所示,实际是对React.createElement方法的调用。
createView
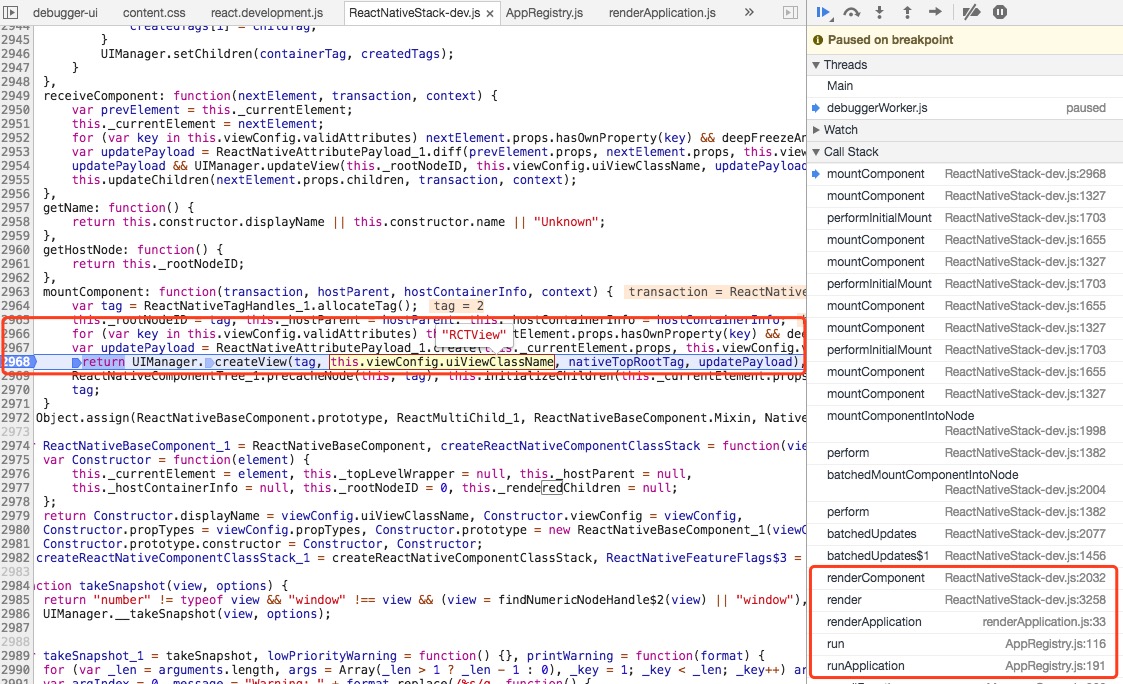
通过上图所示长长…的调用堆栈后,来到了UIManager.createView,其调用的就是 Native module:RCTUIManager的createView:viewName:rootTag:props:方法(Native view 当然要在 Native 环境下创建了^_^):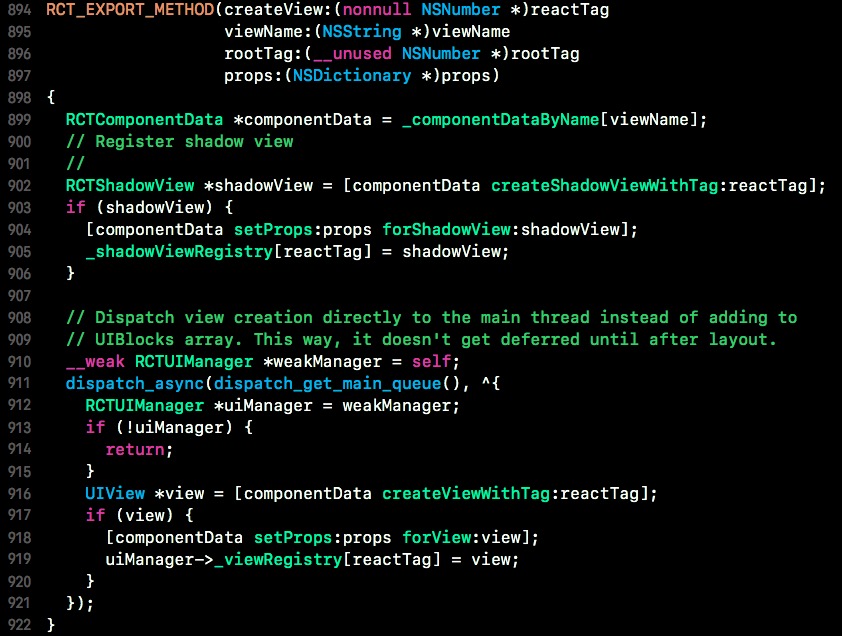
对
RCTComponentData不陌生吧,前文讲过在RCTUIManager#setBridge:方法可知:所有的RCTComponentManager都会以RCTComponentData格式储存在RCTUIManager->_componentDataByName中。
如上代码所示,首先会创建与 view 对应的 shadowView(第902行),并存入 shadowView 注册表_shadowViewRegistry中。
shadowView 的主要功能是通过facebook-Yoga进行布局相关的计算,一般情况下直接使用
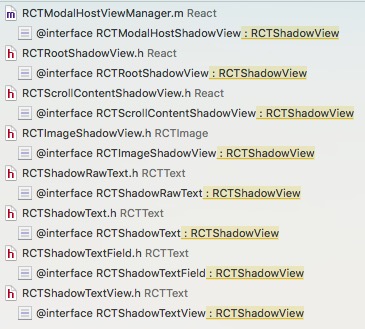
RCTShadowView类即可,若有特殊需求可从RCTShadowView类派生子类。RN提供的众多 UI 组件中,从RCTShadowView类派生的有(感兴趣的可以去看看这些派生类具体实现了哪些功能):
第912~920行,在主线程创建了目标 view,并添加到 view 注册表_viewRegistry中(注意此时并没有添加视图层级树中,即调用addSubview:)。
View Property
通过RCT_EXPORT_VIEW_PROPERTY宏,可以将 Native UI Component 的属性曝露给 RN,如在RCTViewManager中曝露的backgroundColor属性:1
RCT_EXPORT_VIEW_PROPERTY(backgroundColor, UIColor)
RCT_EXPORT_VIEW_PROPERTY宏接受两个参数分别是要曝露的属性名以及属性类型,将其展开如下(是不是有种熟悉的味道,Native module 曝露给 RN 的方法也是通过类似的手法实现的):1
2
3+ (NSArray<NSString *> *)propConfig_backgroundColor {
return @[@"UIColor"];
}
除了
RCT_EXPORT_VIEW_PROPERTY,还有另外两个宏RCT_REMAP_VIEW_PROPERTY、RCT_CUSTOM_VIEW_PROPERTY,其核心思想是一样的,在此就不赘述了。
之后在 JSX 的标签中就可以使用 view 曝露的属性: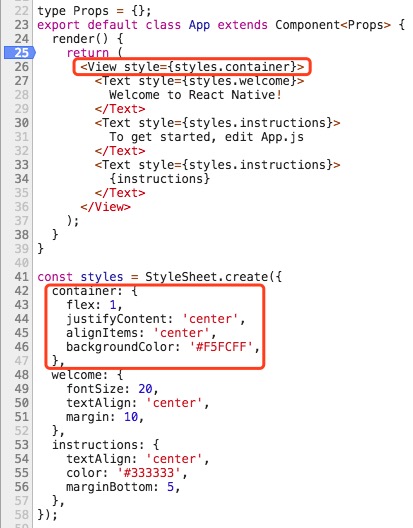


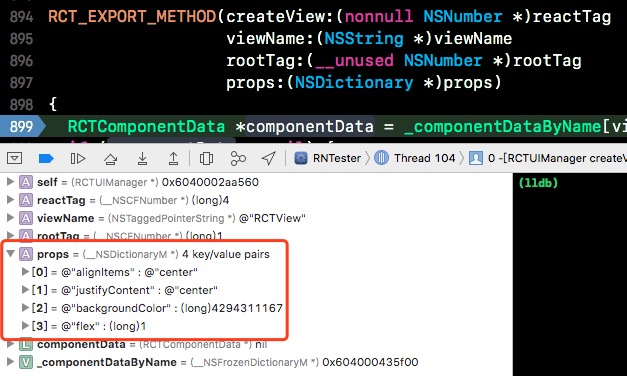
如图所示,在 JSX 中给 view 设置的属性被转换为UIManager.createView的第四个参数,最终也就传到了 Native module:RCTUIManager的createView:viewName:rootTag:props:方法中。
在前一小节(createView)中展示了RCTUIManager的createView:viewName:rootTag:props:方法,其第918行调用了RCTComponentData的setProps:forView:方法,即为 view 的属性赋值。由于篇幅关系,具体赋值过程在此不细述,核心是通过RCT_EXPORT_VIEW_PROPERTY宏生成的propConfig_*方法获取属性的类型,再将 JS 传过来的值进行相应的类型转换后赋给目标 view。
在
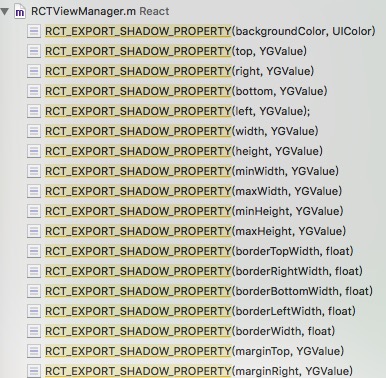
RCTUIManager#createView:viewName:rootTag:props:的第904行,调用了RCTComponentData#setProps:forShadowView:方法,即为 shadowView 的属性赋值。我们知道,shadowView 的主要作用是布局计算,通过RCT_EXPORT_SHADOW_PROPERTY宏曝露相关属性:
可以看到,其曝露的属性也都是与布局相关的。
是时候出个序列图,回顾一下整体流程了:
前文已提到,RCTUIManager#createView:viewName:rootTag:props:只是创建了目标 view 并添加到_viewRegistry中(仅此而以)。
从上图可以看到,JS 中的ReactNativeBaseComponent模块在调用RCTUIManager的createView:viewName:rootTag:props:方法创建目标 view 之后,还会调用RCTUIManager的setChildren:reactTags:方法: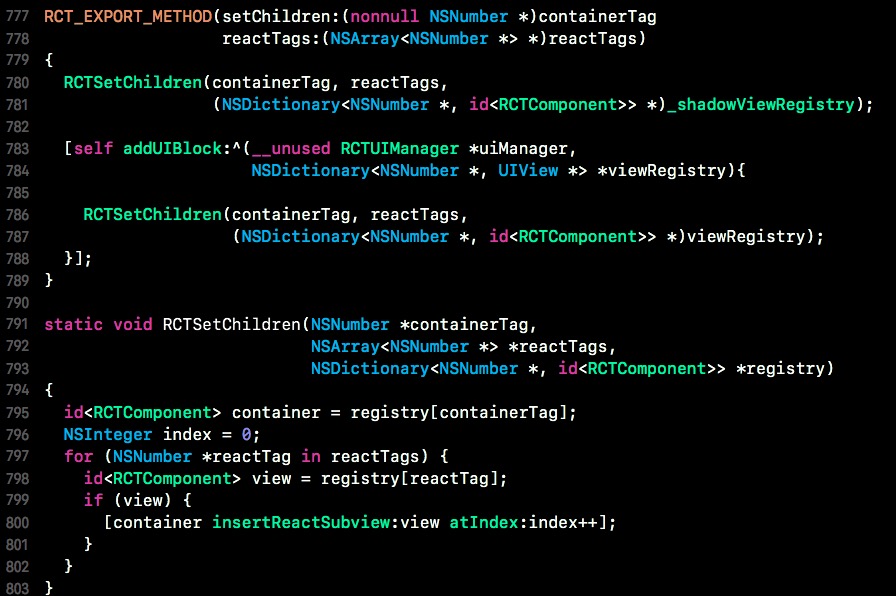
如上图源码所示,setChildren:reactTags:分别针对_shadowViewRegistry以及_viewRegistry(在 UIBlock 中完成调用)调用了静态方法:RCTSetChildren。
其中,shadowview 最终会调用到RCTShadowView#insertReactSubview:atIndex:方法: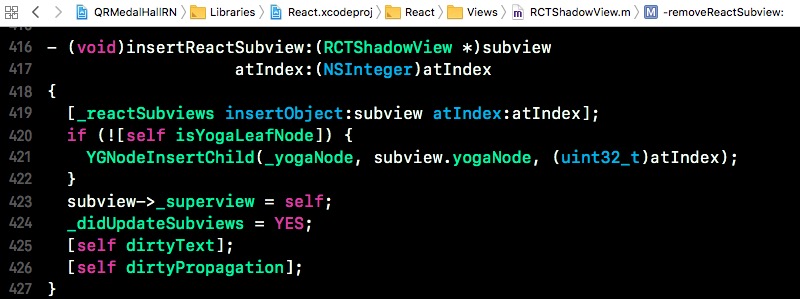
在该方法中,做的最核心的事情莫过于在YGNode树中插入相应的子节点(第421行)。
对于 view,最终会调用到UIView+Rect的insertReactSubview:atIndex:方法: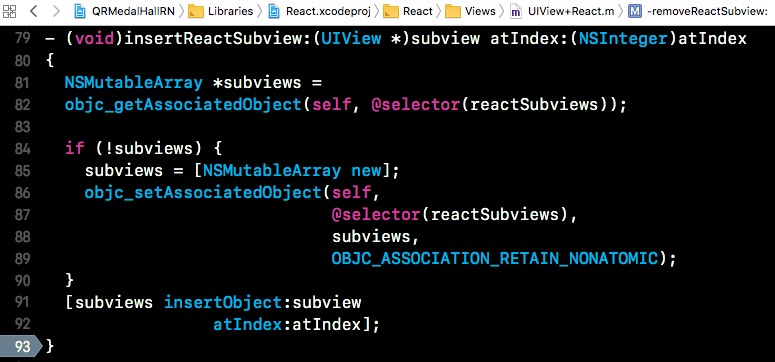
在该方法中,按照层级顺序(index)将subView 添加到AssociatedObject reactSubviews中,还是没有真正添加到视图层级树中!
Pending UI Block
阅读RCTUIManager的源码会发现,所有 JS to Native 的 UI 操作都不会立即执行,而是先添加到UIManager->_pendingUIBlocks中,
那么,_pendingUIBlocks中的 block 什么时候会执行呢?
在『ReactNative源码解析——通信机制详解(1/2)』一文中,我们介绍过为了提高效率,在 RN 中使用了批处理的方式: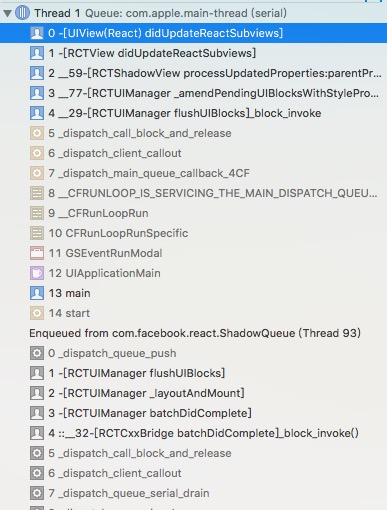
如上图,JS 在完成一批操作后,会通知 Native,此时会调用RCTUIManager#flushUIBlocks方法。
同时,可以看到RCTUIManager#flushUIBlocks最终会调用UIView+Rect的didUpdateReactSubviews方法,如其源码所示,在该方法中完成了 view 添加到视图层级树的操作:
如flushUIBlocks方法源码所示,最终会在主线程执行 UI block: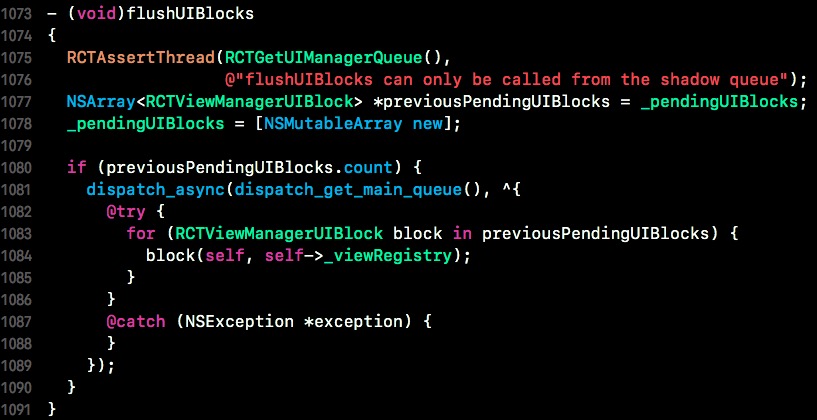
至此,RN 中整个渲染流程基本完成。
