本文通过分析源码,逐步解析 ReactNative 中 Native to JS 的通信机制。
©原创文章,转载请注明出处!
Native to JS
在『ReactNative源码解析——通信机制详解(1/2)』一文中通过 RN 源码逐步分析了 JS to Native 的通信机制,整个过程相当还是比较复杂。本文同样通过解析源码,逐步分析 Native to JS 的过程。
相比 JS to Native,Native to JS 简单不少。
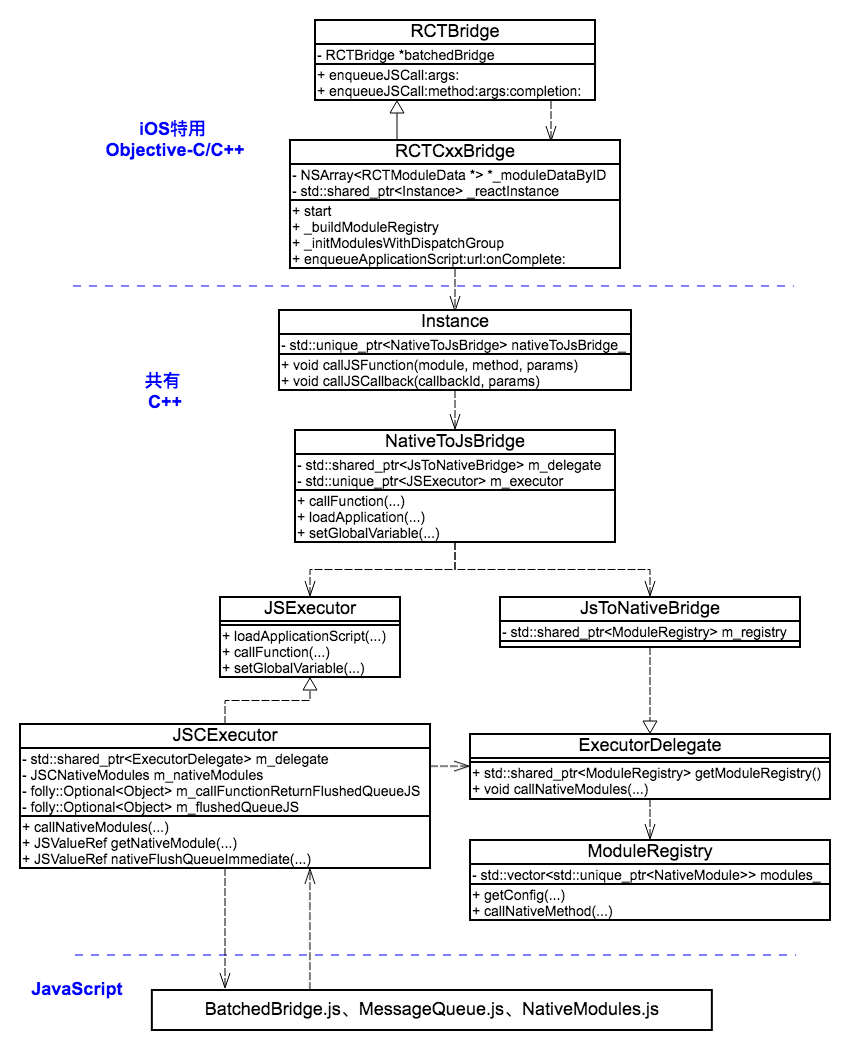
这是我们在『ReactNative源码解析——通信机制详解(1/2)』一文中给出的 RN 关键类类图。
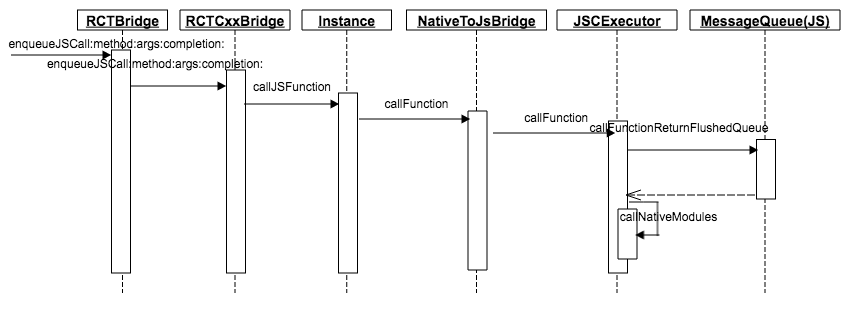
上图是 Native to JS 的时序图,RCTBridge 作为 RN 对外接口,Native 调用 JS 的方法自然也需要从此发出。上图中的方法调用链比较简单,不一一分析。
在『ReactNative源码解析——通信机制详解(1/2)』中,我们知道NativeToJsBridge是 Native to JS 的桥接,NativeToJsBridge做的最重要的一件事就是线程管理——使所有的 JS 调用都在指定的线程上执行。(RN中关于线程问题,后面会另开文章专门讨论。)JSCExecutor是 RN 中 JS 执行引擎,今天的分析就从此开始。
JS to Native 的流程进入JSCExecutor::callFunction。
JSCExecutor::callFunction
1 | void JSCExecutor::callFunction(const std::string& moduleId, const std::string& methodId, const folly::dynamic& arguments) { |
在callFunction方法中,首先判断环境是否准备好(第3行),若尚未准备好,则进入bindBridge1
2
3
4
5
6
7
8
9void JSCExecutor::bindBridge() throw(JSException) {
std::call_once(m_bindFlag, [this] {
auto global = Object::getGlobalObject(m_context);
auto batchedBridgeValue = global.getProperty("__fbBatchedBridge");
auto batchedBridge = batchedBridgeValue.asObject();
m_callFunctionReturnFlushedQueueJS = batchedBridge.getProperty("callFunctionReturnFlushedQueue").asObject();
m_callFunctionReturnResultAndFlushedQueueJS = batchedBridge.getProperty("callFunctionReturnResultAndFlushedQueue").asObject();
});
}
bindBridge方法主要完成一些初始化准备工作:从 JS 则获取batchedBridge object 以及若干个方法(m_callFunctionReturnFlushedQueueJS等)。
在BatchedBridge.js中可以找到__fbBatchedBridge的定义:1
2
3
4
5const BatchedBridge = new MessageQueue();
Object.defineProperty(global, '__fbBatchedBridge', {
configurable: true,
value: BatchedBridge,
});
可以看到,在 Native 里面拿到的batchedBridge是一个MessageQueue类型的 JS object。m_callFunctionReturnFlushedQueueJS则是 JS 类MessageQueue的callFunctionReturnFlushedQueue方法。
回到JSCExecutor::callFunction,在第6行执行了callFunctionReturnFlushedQueue方法。
MessageQueue.callFunctionReturnFlushedQueue(JS)
1 | callFunctionReturnFlushedQueue(module: string, method: string, args: Array<any>) { |
callFunctionReturnFlushedQueue方法调用了内部的__callFunction方法。1
2
3
4
5
6
7__callFunction(module: string, method: string, args: Array<any>) {
this._lastFlush = new Date().getTime();
this._eventLoopStartTime = this._lastFlush;
const moduleMethods = this._getCallableModule(module);
const result = moduleMethods[method].apply(moduleMethods, args);
return result;
}
__callFunction通过 moduleName在 JS Module 注册表中找到该 module,并调用相应的方法。
PS:
JSCExecutor::callFunction->MessageQueue.callFunctionReturnFlushedQueue这套接口不会将要调用的 JS 方法的返回值传给 Native 侧。
如需返回 JS 方法的返回值,可调用另外一套接口:JSCExecutor::callFunctionSyncWithValue->MessageQueue.callFunctionReturnResultAndFlushedQueue。
but,在callFunctionSyncWithValue方法的声明处有注释:『This method is experimental, and may be modified or removed』
JS Module 注册表
上一节,我们提到 JS Modulde 注册表(_lazyCallableModules),所有曝露给 Native 的 JS Module都需要注册。1
2
3
4
5
6
7
8
9
10
11
12
13
14
15
16
17
18
19registerCallableModule(name: string, module: Object) {
this._lazyCallableModules[name] = () => module;
}
registerLazyCallableModule(name: string, factory: void => Object) {
let module: Object;
let getValue: ?(void => Object) = factory;
this._lazyCallableModules[name] = () => {
if (getValue) {
module = getValue();
getValue = null;
}
return module;
};
}
_getCallableModule(name: string) {
return this._lazyCallableModules[name]();
}
JS Module 注册表支持懒加载。
可通过registerCallableModule或registerLazyCallableModule接口注册。
如在RCTEventEmitter.js中注册的消息模块RCTEventEmitter:1
BatchedBridge.registerCallableModule('RCTEventEmitter', eventEmitter);
在InitializeCore.js中注册的基础模块(懒加载):1
2
3
4
5
6
7
8BatchedBridge.registerLazyCallableModule('Systrace', () => require('Systrace'));
BatchedBridge.registerLazyCallableModule('JSTimers', () => require('JSTimers'));
BatchedBridge.registerLazyCallableModule('HeapCapture', () => require('HeapCapture'));
BatchedBridge.registerLazyCallableModule('SamplingProfiler', () => require('SamplingProfiler'));
BatchedBridge.registerLazyCallableModule('RCTLog', () => require('RCTLog'));
BatchedBridge.registerLazyCallableModule('RCTDeviceEventEmitter', () => require('RCTDeviceEventEmitter'));
BatchedBridge.registerLazyCallableModule('RCTNativeAppEventEmitter', () => require('RCTNativeAppEventEmitter'));
BatchedBridge.registerLazyCallableModule('PerformanceLogger', () => require('PerformanceLogger'));
至此,Native to JS 的流程基本结束。
but,事情并没有结束。
前面讲到,callFunctionReturnFlushedQueue不会返回所调 JS 方法的返回值,但它确有返回值(从 JS 传给 Native):1
return this.flushedQueue();
在分析 JS to Native 时介绍过,出于性能考虑所有从 JS to Native 的调用都会先入队,只有满足一定的条件(离上一次 flush queue 大于5ms)才会被执行。
所有 Native to JS的调用,在其结束时都会触发一次 flush queue 的操作,即 flush 所有入队的 JS to Native 的调用。
小结
Native to JS 的通信过程相对比较简单,总结主要有两点:
- 所有曝露给 Native 的 JS Module 都需要提前注册;
- 在 Native to JS 调用结束时,会触发 flush JS to Native Queue 的操作。
总结
RN 中 Native 与 JS 的通信机制基本分析完成,总结主要有以下几点:
- RN 项目中涉及多种语言,但 Native 与 JS 的通信发生在
C++与JavaScript间; - 双方具体负责通信的分别是:Native 的
JSCExecutor与 JS 的MessageQueue; - 在 Native 侧维护了一份曝露给 JS 的 module 注册表,在 JS 侧维护了一份曝露给 Native 的 module 注册表;
- RN 中 Native to JS 的通信没有使用
JavaScriptCore提供的机制(block、JSExport),而是自己实现了一套跨平台通信机制。